Grandbot: MIDI & Misc
May 01, 2024
Disclaimer: I don’t know what I’m talking about. I’m a JavaScript dev who’s just learning this stuff too. I’m sharing what I think I learned, but that doesn’t make it the truth.
Project originally inspired by the work of Mohit Bhoite.
Code references the state as of this tag.
Just a couple of random thoughts about Grandbot.
Custom PCB
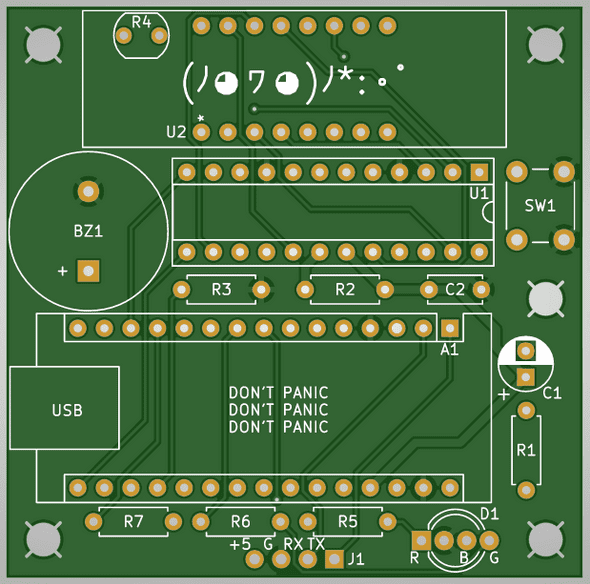
Grandbot was looking a little sad in the breadboard and I kept accidentally unplugging things. I thought it was time to move him into a permanent home, so I downloaded KiCad and learned how to make my own PCBs.
After a couple rounds of mistakes, I ended up in a good place. Gerber files are part of the source now.
MIDI
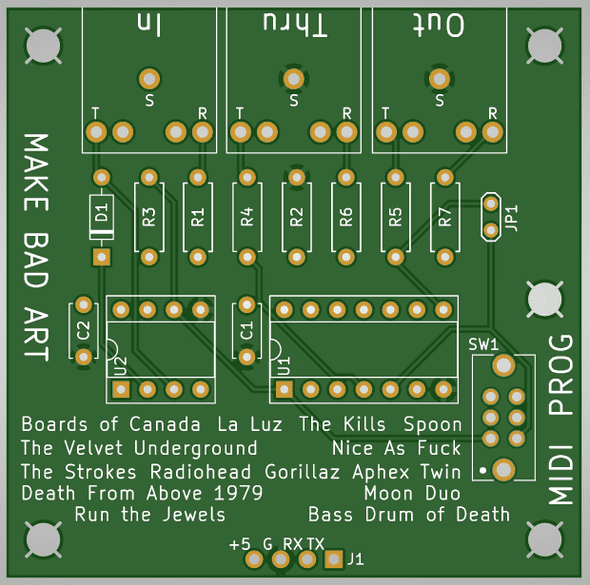
After learning a little about how MIDI works, I thought it would be fun to make Grandbot play synths. In order to do that I needed to have MIDI in and out, so I added an add-on MIDI board.
One inspiration was PJRC’s design for Teensys:
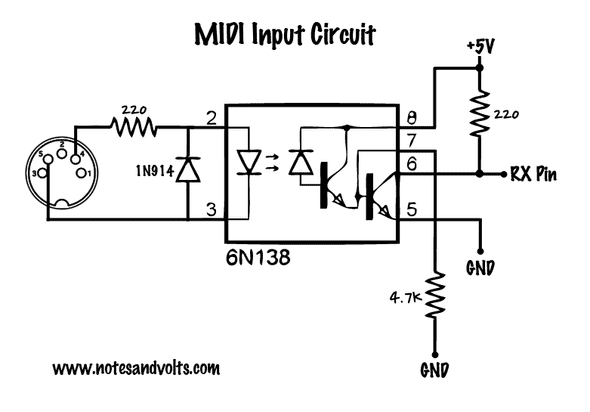
The other was Notes and Volts design for Arduino:
Some thoughts on the design:
- MIDI In is buffered and sent to MIDI Thru
- MIDI In is also sent to the RX pin on the Nano
- The Nano’s TX pin is sent to the MIDI Out
- Using MIDI TRS to save space
- The 6N138 optocoupler is per the MIDI spec to isolate the MIDI In circuit from the outside world
- The 74HC14 inverters are also recommended by the spec, I believe to tighten up the HIGH/LOW signals to prevent noise in the signal
- The jumper is to bypass the 74HC14 is not using MIDI Thru (making the 74HC14 optional)
-
The switch is because the Nano shares it’s serial TX/RX lines with it’s USB connection
- Both USB and MIDI are serial
- The Nano only has one serial connection
- Programming Grandbot while MIDI was active caused connection issues
- The switch breaks the MIDI connection when set to PROG
- This is also true for Sparkfun’s MIDI Shield
Gerber files for the MIDI board are also part of the source now.
Arduino Nano vs Arduino Nano Every
I built this whole project using a cheap Arduino Nano clone. It was never really a problem until I got to the Arp/MIDI at which point I couldn’t use Serial.print anymore because the serial connection was being used by MIDI. Despite not having a way to debug, I still continued to use the Nano because I am dumb. Talk about painful troubleshooting!
Turns out there’s a thing called an Arduino Nano Every that works as a drop-in replacement for the Nano, but with additional serial ports and a ton more memory. I only looked into it at the end of the Arp feature when I surpassed the Nano’s memory limits. Ironically I had been using the Nano Every footprint in KiCad the whole time - I just thought it meant “every Nano.” 🤦
My understanding is the Nano Every uses different TX/RX connections for USB and pins 1/2 (the pins I had been using for MIDI). That should mean:
- I can
Serial.printwhile debugging MIDI - I don’t need the switch on the MIDI board
I haven’t confirmed yet though.
Anyway, the positives:
- Official Nano Every is cheaper than the official Nano
- More memory means more steps in the arpeggiator
- Separate serial lines for MIDI and debugging
The negatives:
- Nano clone is cheaper than official Nano Every
- If you’re not using the MIDI board, a Nano clone would be fine
So right now I’m trying to continue support for both Nano and Nano Every.


